• Skip to primary navigation
  • Skip to main content
  • Skip to primary sidebar
Comfort and Yum
  • Home
  • Carnivore Challenge
  • All Recipes
  • Frugal Living
  • Crafty

YARDZEE! A Bucket of Fun for Family and Friends!

September 14, 2015 by WinterPrime

Yardzee Set - Play Anywhere

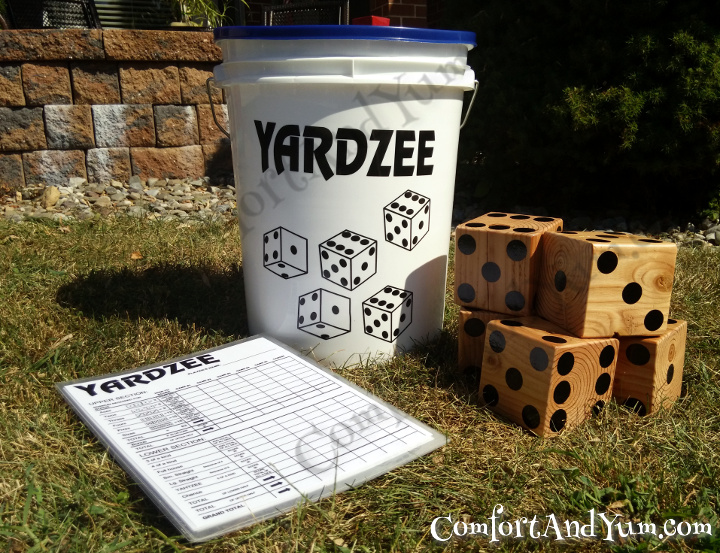
Some friends and I are part of a Silhouette Challenge group. This group challenges us to create new projects and ideas based on a monthly theme where we use our Silhouette machines as part of creating (as a template or stencil) or the finished product. This is my September’s challenge project. Please check out everyone’s September Outdoor project listed near the bottom of my post — who knows what kind of great ideas you’ll find! Also, keep reading as I’ve included a free template file so you can make your own Yardzee dice! Woo Hoo!!

Growing up, I remember spending hours and hours sitting around someone’s kitchen table playing games. Usually card games like Rummy or Uno, but sometimes we’d play Yahtzee and those dice bouncing all over the table was sooooooooo much a part of the fun! It was challenging to get winning combinations and also have everyone scrambling to stop dice from bouncing off the table!

The only bad thing about Game Nights were they stopped during the summer. The outdoor games were more complicated — they needed nets or hoops set up. And normally involved balls that zero’ed in on ME and generally bounced off of my head at least once. Volleyball concussions anyone?? Not Fun! Nope, nuh uh.

Boy, I wish I’d known about YARDzee back then. It probably existed, if you knew where to look. The internet didn’t exist and Etsy was still a twinkle in someone’s imagination. If you were a DIY’er, the project wouldn’t have been nearly as jazzy or as easy to make as it now is. That’s due to a machine capable of cutting out the bucket decorations and perfectly round & perfectly spaced dice pips.

Your Mostly Useless Trivia For The Day: A single “dice” is called a die and multiples are called dice. The round dots on a die are called pips!

This project was fun and hard work, but totally do-able if you have the time and a few tools.

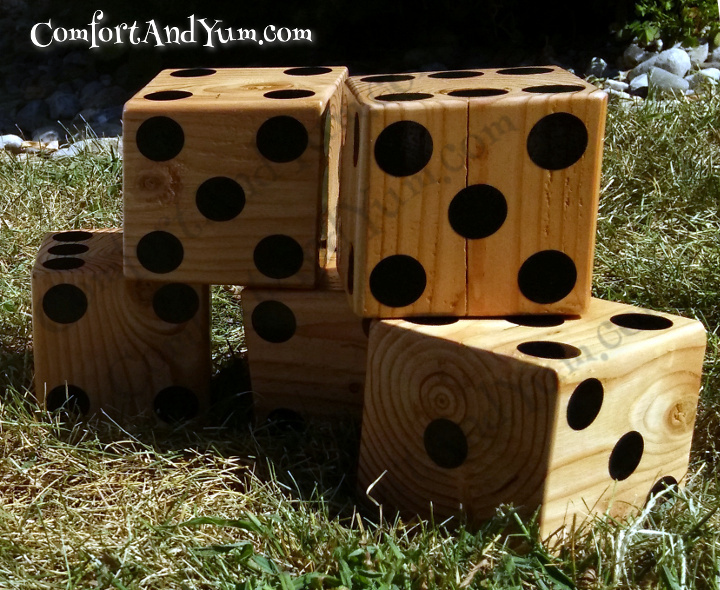
First you’ll need 5 cubes of wood. My dice are made from kiln dried fir and measure 3-1/2″ x 3-1/2″ and there’s a good reason for that. I start out with a 4″x”4″ fence post and cut it down, but I only have to cut it lengthwise into 3-1/2″ pieces. How does that work? Well, a 4″ x 4″ fence post is actually 3-1/2″ x 3-1/2″ … it’s a lumber/construction thing. You’ll always get the length you are buying, but you will rarely get the width and thickness. Seems everyone is economizing and making their products smaller for the same price — not just grocery stores!

Please Note: If you decide to cut these cubes yourself, you will need a 12″ table or chop saw. I’ve been told that a 10″ saw is not big enough to go all the way through the wood and you’ll have to make multiple cuts. A circular (hand-held) saw rarely comes with a blade larger than 7-3/4″ and you don’t even want to think about cutting these with a hand saw. The only way to get a really even cut is with a chop or miter saw. Otherwise your dice will be wonky.

No Power Tools Tip: If you don’t have and/or don’t want to use a saw to cut the dice, many Home Depots will cut these for you if you ask them. Especially since you only need 5 cuts.

Now comes the fun part! I prefer to just put a clear sealer on the wood dice and let the natural color and wood grain show through. But you can paint them too. I’ve seen many sets created in team colors!

  • Orange with Navy pips for Auburn University (War Eagles!)
  • Black with Metallic Gold pips for Pittsburgh Steelers
  • Blue with White pips for New York Giants
  • Silver with Blue pips for Dallas Cowboys

You get the picture!

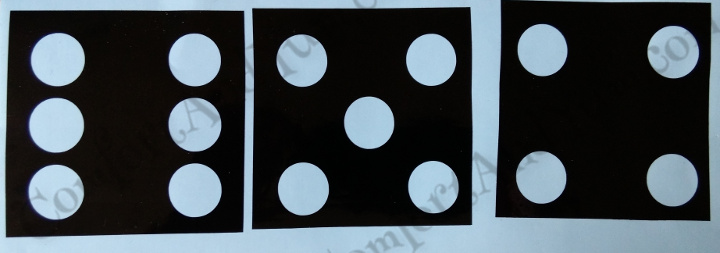
Now, if you plan to paint the pips onto the dice, you’ll want to use the template I’ve provided below in this post. Cut out a stencil from contact paper or vinyl using a cutting machine. I have a Silhouette Cameo that I love, love, LOVE! Once the stencil is cut, weed out the pips leaving the large area and cover your cube. Then paint your pips with a couple of coats of your chosen color. Then carefully peel off the vinyl after the paint is dry.

Here’s what a couple of my vinyl stencils looked like after I weeded them out. The black is the vinyl and the blue is the backing. After you lay down the contact paper or vinyl on the cubes, where the wood shows through is where the paint will adhere to the wood and where ever the vinyl is stuck down, the paint will just sit on top until you remove the stencil.

Die Template for Paint

All of the dice needs to have the following sides and this is the order the pips need to be placed on the cubes.

Pips Layout for Dice

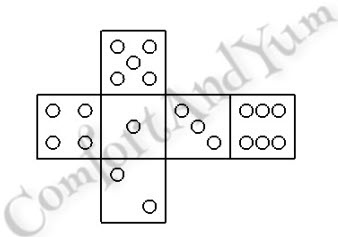
I generally start with the side that has 6 pips and I work my way towards the left.

If you are cutting your pips out of vinyl and you don’t have a vinyl cutting machine, you can cut them by hand using a 3/4″ hole punch. I’ve never used a hole punch for vinyl myself since I have my Silhouette Cameo, but I read where others have. If you are cutting them using a hole punch, you will need 105 circles to make all 5 dice. Once the pips have been applied to your cubes, allow the vinyl to cure for 48 hours before use.

Yardzee Dice Only

So if you are interested in making your own set of Yardzee Dice, here’s the link for the template file.


Yardzee Dice Template File #1

Yardzee Dice Template File #2


Prefer to Buy a Yardzee Set?

We make a limited number of Yardzee sets each year with personalized Bucket decorations!

Yardzee Set - Personalized Side

YARDZEE Sets include:

  • Decorated & Personalized Bucket with Lid – white bucket only. Normally with a white or black lid.
  • 5 Dice with Natural Finish & Vinyl Pips – choice of color optional (If you need 6 dice for Farkle, let me know in advance.)
  • 5 Laminated Yardzee/Farkle Scorecards for use with Dry Erase Markers (markers not included)
  • Yardzee Instructions

Price: $75 plus shipping. Please note that shipping for this item is very high. The set weighs over 25 lbs. and the shipping box dimensions lets USPS, UPS or FedEx add on an oversize charge.
Free local Lehigh Valley, PA meet-up and delivery available.
Payment is due in advance for both shipping and meet-up options and the set requires a 1-4 week turnaround time depending on the season.

If interested, please contact me here.

Just Want The Bucket Decals??

OK, you’ve got it! You receive them flat and ready to install on your own bucket — available at most Home Depot, Lowes or Menards. Saves on shipping costs. Here’s what you’ll get:

  • Personalized Bucket Decals – one with your personalization & one with the image of your choice
  • All Decals come with Transfer Tape pre-applied and ready to install
  • 5 Laminated Yardzee/Farkle Scorecards
  • Yardzee Game Instructions
  • Step-by-step Decal Application Instructions
  • Application Tool
  • Care Tips
  • Bucket, Lid & Dice are NOT included
  • Dice Decals Sold Separately

Price: $25 plus shipping

If interested, please contact me here or visit my Handmade @ Amazon shop.

How About Dice Decals Already Made for You

We can do that for you too! Dice decals sized to apply to your wood or plastic dice. Decals are sized to fit a standard wood fence post (4 inches square — but really 3.5×3.5 inches).

  • Dice Decals – enough for 5 dice. If you need enough for 6 dice to play Farkle, let me know.
  • Your choice of available vinyl colors
  • All Decals come with Transfer Tape pre-applied and ready to install
  • Step-by-step Decal Application Instructions
  • Application Tool
  • Care Tips
  • Bucket, Lid & Wooden Dice not included
  • Bucket Decal Set Sold Separately

Price: $18 plus shipping

If interested, please contact me here or visit my Handmade @ Amazon shop.


Want to Check Out More Silhouette Projects?

My Silhouette Challenge buddies and I are all sharing projects on our blogs today, so check out the projects below for more Silhouette inspiration!

Update Your Mailbox A Watering Can With Personality YARDZEE! A Bucket of Fun for Family and Friends! DIY Home Address Plaque Free Flying Lessons Witchy Halloween Sign with {FREE CUT FILE} Shabby Chic 'Happy Fall' Pumpkin Door Hanger: My Girly Gourd Glow In The Dark Pumpkins How Does Your Garden Grow? A decorated Planter. Outdoor Fall Welcome Sign Nautical Personalized Cooler A "Green" Mailbox Makeover Seed Packet Storage Tin "Something Wicked" Porch Banner Catch-a-Bug Box Southwester & Outdoorsy DIY Coasters

1. From Whine to Whine // 2. Small Stuff Counts // 3. Comfort and Yum // 4. Patina Paradise // 5. My Paper Craze // 6. Where The Smiles Have Been // 7. Practically Functional // 8. Get Silvered // 9. DIYJustCuz {Brittany} // 10. Dragonfly & Lily Pads // 11. Crafty Bonds // 12. Two Purple Couches // 13. Tried & True // 14. It Happens in a Blink // 15. DIY Just Cuz {Sam}


FRUGAL CAVEAT: I like to give people all their options and I also like to be up-front about the cost of things. There’s nothing worse than to get excited about a DIY project and then discover you need a bunch of items that you weren’t told about. Now you need to abandon the project or shell out even more money.

This is one of those projects that can end up on Pinterest as the $9 DIY Project that cost $200. If you don’t have any of the products necessary already at home and you have to go buy everything, the costs can add up fast.

It may be cheaper and less stressful to just buy a Yardzee Set – from me, if I’m currently offering them, or by doing a partial DIY.

Here’s the price break-down for everything that you’ll need to make a set based on having nothing at home.

  • Kiln-dried fir (NOT pressure treated) 4″ x 4″ x 8′ fence post – Home Depot: $12.92
    Home Depot will cut the fence post for you if you ask. I’ve had them cut enough for a set for me.
  • 80 grit Sandpaper:  $2.97
  • 100-150-220 grit Sandpaper variety pack: $2.97
  • 5 Gallon Bucket – white, no markings – Lowes: $4.68
  • 5 Gallon Bucket Lid: $1-$2 (depending on store & color)
  • Goo Gone: $3-$4 – to remove stickers & the sticky residue from the bucket
  • Valspar 8 oz. Paint Sample  (if you want to color your dice): $3.48
  • Minwax Semi Gloss Polycrylic: $9.47
  • Decent 2″ Angle Paint Brush: $5
  • Foam Brush (if you plan to paint on pips): $0.79
  • Blue Painters Tape (if you plan to paint on pips): $3.93
  • X-acto Knife (if you plan to cut out pips or stencils by hand): $8.38
  • 3/4″ Hole Punch (for pips or stencil): $9.97
  • Outdoor Vinyl (for pips or stencil): $10 or more
  • Contact Paper (to make stencil if painting): $6.78

Additions for the REALLY SERIOUS crafters out there:

  • Professional Vinyl Cutting Machine or Hobbyist Silhouette Cameo machine: $284-$1,800
  • Belt Disc Sander: $75 or more
  • Outdoor Vinyl: $10 or more
  • Transfer Tape: $20
  • 12″ Chop (Miter) Saw: $237.97 or more
  • Chop (Miter) Saw Table: $199 or more

Now, before you get discouraged … DON’T!!

You are here because you like DIY. If you don’t want to do the whole thing yourself, I can provide you with vinyl bucket decorations and/or dice pips and you can apply them yourself! That’s still very much a DIY project the whole family can get into!

Previous Post: « Back To School Time Again
Next Post: How We Save $9,099 a Year Without Giving Anything Up! »

Reader Interactions

Comments

  1. Pam - GetSilvered

    September 14, 2015 at 10:26 am

    What a great idea. I’ve never heard of the game before, seems like fun. I love your dice.

    Reply
  2. Emily @ Two Purple Couches

    September 14, 2015 at 11:20 am

    I’ve seen so many fun yard games this summer, but I think I love this one the best! Yahtzee was always a family favorite!

    Reply
  3. Brittany @ DIY Just Cuz

    September 14, 2015 at 3:39 pm

    I’ve heard of Yardzee before but I never thought to make it myself–I love it!! It’d be the perfect game to play at my mom’s house during all of the holiday get togethers. Thanks for sharing this!! I gotta make it now 🙂

    Reply
  4. Vanessa

    September 14, 2015 at 8:29 pm

    Super fun set you have there! Love the customized bucket!

    Reply
  5. Sam // DIY Just Cuz

    September 14, 2015 at 9:32 pm

    This is awesome! What a great idea, I looooved yatzee and this is perfect for the kids (don’t have to worry about losing any die! So cool…

    Reply
  6. JEnnifer

    March 21, 2016 at 10:58 am

    Hi I have been trying to get the download and I never receive an email? Can anyone help me?

    Reply
    • Winter

      April 15, 2016 at 10:54 pm

      Jennifer – let me find the file and I’ll send it to you. Cheers, Winter!

      Reply
  7. Darla

    May 11, 2016 at 9:51 am

    Just an FYI, the reason a 4×4 post is only 3 1/2 x 3 1/2 is because when the wood is cut it is wet (all the moisture from being a living tree) and it is cut 4″ x 4″. When it dries it shrinks. So it is not a case where anyone is trying to sell you less, it is just the nature of the beast, and it is more streamline to mark it at its original cut size because all boards dry differently.

    Reply
  8. Stephen Harrell

    July 11, 2016 at 11:45 am

    I think I will use my router with an eighth inch roundover bit to curve the edges of the blocks. That will be much easier and more uniform t?Han sanding.

    Reply

Trackbacks

  1. Free Flying Lessons Witchy Halloween Sign with {FREE CUT FILE} - My Paper Craze says:
    September 14, 2015 at 10:18 am

    […] From Whine to Whine // 2. Small Stuff Counts // 3. Comfort and Yum // 4. Patina Paradise // 5. My Paper Craze // 6. Where The Smiles Have Been // 7. Practically […]

    Reply
  2. Update Your Mailbox - From Wine to Whine says:
    September 14, 2015 at 10:26 am

    […] From Whine to Whine // 2. Small Stuff Counts // 3. Comfort and Yum // 4. Patina Paradise // 5. My Paper Craze // 6. Where The Smiles Have Been // 7. Practically […]

    Reply
  3. Southwestern & Outdoorsy DIY Coasters - DIY Just Cuz says:
    September 25, 2015 at 10:24 pm

    […] From Whine to Whine // 2. Small Stuff Counts // 3. Comfort and Yum // 4. Patina Paradise // 5. My Paper Craze // 6. Where The Smiles Have Been // 7. Practically […]

    Reply
  4. Big Fun in the Backyard | Craft Hackers says:
    July 3, 2016 at 2:27 pm

    […] The tutorial, found here, seems pretty easy to follow and won’t take long if you are pretty handy with the power tools! Want something a bit simpler? How about a game of Yardzee: […]

    Reply
  5. Shabby Chic Happy Fall Pumpkin Door Hanger says:
    September 14, 2017 at 5:52 pm

    […] From Whine to Whine // 2. Small Stuff Counts // 3. Comfort and Yum // 4. Patina Paradise // 5. My Paper Craze // 6. Where The Smiles Have Been // 7. Practically […]

    Reply
  6. How To Make No-Carve Glow In The Dark Pumpkins – Practically Functional says:
    October 11, 2021 at 3:29 pm

    […] From Whine to Whine // 2. Small Stuff Counts // 3. Comfort and Yum // 4. Patina Paradise // 5. My Paper Craze // 6. Where The Smiles Have Been // 7. Practically […]

    Reply

Leave a Reply to Southwestern & Outdoorsy DIY Coasters - DIY Just Cuz Cancel reply

Your email address will not be published. Required fields are marked *

Recipe Rating


This site uses Akismet to reduce spam. Learn how your comment data is processed.

Primary Sidebar

Meet Winter! Winter from Comfort and Yum!
I love all things comfy & crafty -- a sizzling steak or maybe a pot roast cooking away in the instant pot. I'd never say "no" to an evening with a good book & fuzzy slippers snuggling under a quilt. I'm a designer who loves to create beautiful things ... yep, I'm a proud craft-a-holic who's forever dipping my fingers into different crafty pies. If it's sparkly, involves digital papers, junk journaling, tumblers, glitter or epoxy ... I'm THERE!

--> More About Me <--

Recent Posts

  • 90 Day Carnivore Challenge | 30 Day Update | Let’s Wrap This Up
  • 90 Day Carnivore Challenge | 30 Day Update | Measurement (Inches Lost) Update
  • 90 Day Carnivore Challenge | 30 Day Update | Weight Loss Update
  • 90 Day Carnivore Challenge | 30 Day Update | Blood Pressure Update
  • 90 Day Carnivore Challenge | 30 Day Update | Health Update

Copyright © 2025 · Comfort and Yum